What to Expect During Water Softener Installation: A Step-by-Step Process Guide
CALL NOW (970) 818-1613We pick up the phone, 24/7
CALL NOW (970) 818-1613Quick Answer: Water softener installation typically takes 2 to 4 hours for a standard residential setup. A licensed plumber will shut off your main water supply, connect the softener to your plumbing line, install a drain connection, program the control valve, and test the system. In Northern Colorado, where water hardness often reaches 15 to 25 grains per gallon, proper installation is critical to protecting your pipes, appliances, and fixtures.
- Timeline: Most installations are completed in a single visit (2–4 hours)
- Prep needed: Clear the installation area, locate your main shutoff, and have electrical access nearby
- What the installer checks: Water hardness levels, pipe material, water pressure, drain access, and electrical availability
- Post-install: Run a regeneration cycle, flush your lines, and schedule annual maintenance
Why Northern Colorado Homes Need Professional Water Softener Installation
If you live in Fort Collins, Loveland, Windsor, or anywhere in Northern Colorado, you already know the water is hard. We’re talking 15 to 25 grains per gallon in most areas, well above the 7 gpg threshold where the Water Quality Association recommends treatment.
That hard water leaves white scale on your faucets, shortens the life of your water heater, and makes soap less effective. A whole house water softener solves these problems, but only if it’s installed correctly.
This guide walks you through exactly what happens during a water softener installation, from the moment the plumber arrives to the first regeneration cycle. No vague overviews. Just the step-by-step process so you know what to expect.
How to Prepare Your Home Before Installation Day
A little preparation goes a long way. Here’s what to do before your installer arrives:
Clear the installation area. Most water softener systems are installed near the main water line entry point, typically in a basement, utility room, or garage. Clear a space at least 3 feet wide and 4 feet deep. Move stored items, shelving, or anything blocking access.
Locate your main water shutoff valve. Your plumber will need to shut off the water supply. Know where the valve is so you can point it out quickly.
Confirm electrical access. A water softener control valve needs a standard 110V outlet within about 6 feet. If there isn’t one nearby, let your installer know ahead of time so they can plan accordingly.
Check drain access. The system needs a drain line for the brine discharge during regeneration. A floor drain, utility sink, or standpipe within 20 feet of the installation point works best.
Note your current water usage. Your installer will ask about how many people live in the home, how many bathrooms you have, and your daily water consumption. This information helps them program the system correctly.
The Water Softener Installation Process: Step by Step
Here’s what a professional water softener installation looks like from start to finish. This is the process our team at JT Plumbing Heating & Air follows on every install.
Step 1: Pre-Installation Inspection
Before any wrench turns, your installer conducts a thorough site assessment. They’ll check:
- Water hardness level — a test kit confirms the exact grains per gallon at your tap
- Water pressure — ideal range is 40 to 80 psi; too high or too low may require additional components
- Pipe material — copper, PEX, CPVC, and galvanized steel each require different fittings and techniques
- Existing plumbing layout — the installer maps the best tie-in point on your main water line
- Drain proximity and slope — ensuring proper drainage for the regeneration cycle
This inspection typically takes 15 to 30 minutes. It’s the most important step because it determines exactly how your system will be configured.
Step 2: Shutting Off the Water Supply
Once the plan is set, your plumber shuts off the main water supply. They’ll also open a faucet at the lowest point in your home to relieve pressure in the lines. Expect your water to be off for 1 to 3 hours depending on the complexity of the install.
Tip: Fill a few pitchers of water before the appointment starts. You’ll want drinking water and water for flushing toilets while the system is down.
Step 3: Cutting Into the Main Line
The installer cuts into your main water supply line after the shutoff valve but before the line branches to the rest of your home. This position ensures that all water flowing into your house passes through the softener.
A bypass valve is installed at this point. The bypass lets you divert water around the softener if it ever needs service, so you’re never without water.
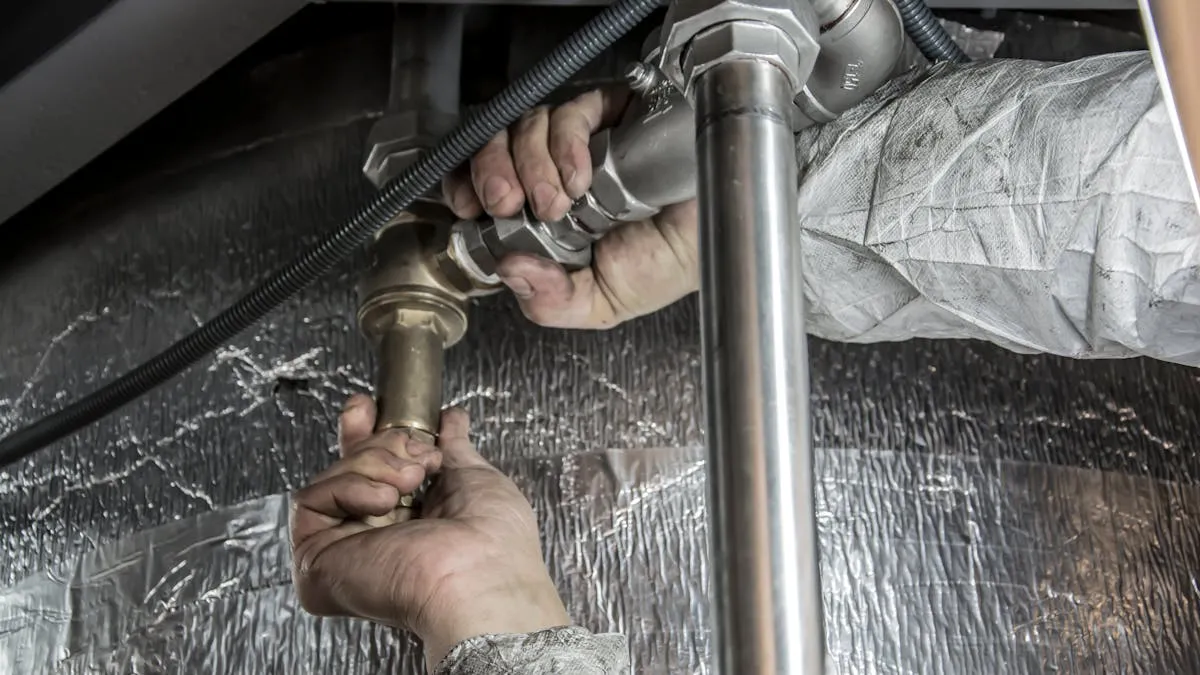
Step 4: Connecting the Softener Tank and Brine Tank
The water softener system has two main components: the resin tank (where the actual softening happens) and the brine tank (which holds the salt for regeneration).
Your installer will:
- Position both tanks on a level surface
- Connect the inlet and outlet ports on the resin tank to your plumbing using appropriate fittings
- Install the brine line between the two tanks
- Secure all connections with compression fittings or soldered joints, depending on your pipe material
Every connection is checked twice. A single loose fitting means a leak behind a wall or under a floor, and that’s not something any homeowner wants to deal with.
Step 5: Installing the Drain Line
During regeneration, the softener flushes the mineral buildup from its resin beads using a salt brine solution. That wastewater needs somewhere to go.
The installer runs a drain line from the softener’s control valve to your nearest drain point. The line must maintain a proper air gap (required by plumbing code) to prevent backflow contamination. In Northern Colorado, local code enforcement takes this seriously, and so do we.
Step 6: Programming the Control Valve
This is where the installation gets customized for your household. The control valve is the brain of your water softener system. Your installer programs it based on:
- Water hardness — the test results from Step 1
- Household size — more people means more water usage
- Iron content — common in Northern Colorado well water and affects regeneration frequency
- Regeneration schedule — typically set for late night when water usage is lowest
Getting these settings right is critical. A system that regenerates too often wastes salt and water. One that doesn’t regenerate enough lets hard water slip through.
Step 7: System Startup and Testing
With everything connected, your plumber slowly turns the water back on. They’ll:
- Open the bypass valve gradually to prevent water hammer
- Check every connection point for leaks
- Run water through the system for several minutes to flush any debris
- Initiate a manual regeneration cycle to confirm the brine tank, drain line, and control valve all work correctly
- Test the water at your tap to confirm softening is active
Your installer should show you the before and after hardness readings. It’s satisfying to see those numbers drop.
How Long Does Water Softener Installation Take?
A straightforward water softener installation in a home with easy access to the main line, a nearby drain, and an existing electrical outlet takes about 2 to 3 hours.
More complex installations, such as homes with finished basements where drywall needs to be worked around, older galvanized pipes that need updating, or long drain line runs, can take 3 to 4 hours.
If you’re replacing an old water softener with a new unit, the job is often faster since the plumbing connections are already in place. Expect 1.5 to 2.5 hours for a replacement.
Common Installation Challenges in Northern Colorado
Every region has its quirks, and Northern Colorado is no exception. Here are the issues our team encounters most often during water softener installation in this area:
Extremely hard water (20+ gpg). Some neighborhoods in Greeley, Loveland, and south Fort Collins test above 20 grains per gallon. At these levels, a standard 32,000-grain softener may not be enough for larger households. Your installer should size the system based on actual test results, not averages.
High iron content in well water. Homes on well water in Wellington, Berthoud, and rural areas between Johnstown and Mead often have elevated iron levels. Iron fouls softener resin faster, so the system may need an iron pre-filter or more frequent regeneration cycles.
Cold-weather considerations. If your softener is installed in an unheated garage or crawl space, the brine tank and supply lines can freeze in a Northern Colorado winter. Your installer should recommend insulation or a heat tape solution for exposed areas.
Older homes with galvanized pipes. Many homes built before the 1970s in Loveland and Greeley have galvanized steel plumbing. These pipes are prone to corrosion and buildup. Your plumber may recommend updating the connection point to copper or PEX during installation for a reliable, long-lasting tie-in.
Limited drain access. In slab-on-grade homes common in newer Windsor and Johnstown developments, floor drains aren’t always available. The installer may need to route the drain line to a utility sink or through an exterior wall (with proper freeze protection).
What to Do After Your Water Softener Is Installed
Installation is done, but there are a few things to handle in the first week and beyond.
First 24 to 48 hours:
- Run your faucets for 5 to 10 minutes to flush air and any loosened sediment from your lines
- Check under sinks and around the softener for any slow leaks
- Your water may feel different immediately. Soft water has a “slippery” feel during washing. That’s normal and means it’s working
First month:
- Monitor your salt level weekly until you learn how fast your system uses it
- Check that the regeneration cycle runs at the scheduled time (you’ll hear the system cycling, usually at 2 AM)
- If you notice spots on dishes or scale reappearing, contact your installer. The hardness setting may need adjustment
Ongoing water softener maintenance:
- Refill salt when the tank is less than one-third full
- Use high-purity salt pellets (not rock salt) to minimize sediment buildup in the brine tank
- Schedule a professional water treatment system inspection annually. A technician will clean the brine tank, check the resin bed, inspect the control valve, and test your water
- Replace the resin bed every 10 to 15 years, depending on water quality and usage
When to Call a Professional vs. DIY
You’ll find plenty of YouTube tutorials on DIY water softener installation. Some of them are decent. But here’s the reality for Northern Colorado homeowners:
- Plumbing code compliance — improper installation can violate local building codes, especially regarding backflow prevention and drain air gaps
- Warranty protection — most manufacturers require professional installation to honor the warranty
- Sizing accuracy — an undersized or oversized system wastes money and doesn’t solve your hard water problems
- Leak risk — one bad connection behind finished walls means water damage that costs far more than professional installation
A licensed plumber gets it done right the first time. For hard water solutions that actually last, professional installation pays for itself. If you’re ready to move forward, contact JT Plumbing Heating & Air for a free estimate, or call us directly at (970) 818-1613.
Frequently Asked Questions
How long does a water softener installation take?
A standard residential water softener installation takes 2 to 4 hours. Replacements are faster (1.5 to 2.5 hours) since plumbing connections already exist. Complex installations involving long drain runs, pipe material upgrades, or limited access can take up to 4 hours.
What water hardness level requires a water softener in Northern Colorado?
The Water Quality Association recommends softening when hardness exceeds 7 grains per gallon. Most Northern Colorado water tests between 15 and 25 gpg, which is moderately hard to very hard. At these levels, a whole house water softener significantly reduces scale buildup and extends appliance life.
Can a water softener be installed in a garage in Colorado?
Yes, but with precautions. Unheated garages in Northern Colorado can drop below freezing in winter, which risks damaging the brine tank and supply lines. Your installer should add pipe insulation or heat tape to protect the system. A basement or heated utility room is the preferred location.
How do I maintain my water softener after installation?
Keep the brine tank at least one-third full with high-purity salt pellets. Check salt levels weekly for the first month, then monthly once you know your system’s usage rate. Schedule an annual professional inspection to clean the brine tank, test water hardness, and check the control valve. The resin bed typically lasts 10 to 15 years before replacement.
Do I need a permit for water softener installation in Fort Collins or Loveland?
Permit requirements vary by municipality. In most Northern Colorado cities, a water softener installation that ties into existing plumbing and doesn’t alter the home’s drain or water supply lines may not require a separate permit. However, if new plumbing lines are run, a permit may be needed. Your licensed plumber will know the local requirements and handle permitting if necessary.
Schedule Your Water Softener Installation
Northern Colorado’s hard water isn’t going anywhere. But you don’t have to live with the scale, the dry skin, or the shortened appliance lifespans. A professionally installed water softener system solves the problem permanently.
JT Plumbing Heating & Air has been serving Fort Collins, Loveland, Windsor, Greeley, and the surrounding communities with expert water softener installation and water treatment services. We’re licensed, bonded, insured, and family-owned.
Call (970) 818-1613 today or contact us online for a free estimate on water softener installation. We also serve Longmont and the St. Vrain Valley — see our Longmont water treatment services page for local details.
Serving Northern Colorado

![]()
![]()
Serving our Community
At JT Plumbing Heating & Air, we feel it’s important to support our Northern Colorado community and the causes that are close to our family. Every year we support local charities, nonprofits, and sponsor community activities that are important to us. Learn more about the causes we support and how you can help.
COMMUNITY INVOLVEMENT